What is a Betty?

Betty is the term used to describe an amazing person who you can depend on. Betty is also a term for "sweet and loving girl." The more you get to know her, the more you love being around her. She has a good sense of humor and has a cute laugh. She's chill yet hard working as well as kind and considerate. Betty lights up the room and lights up my life. She's always happy and cheerful. She's also cuddly, independent and smart. She appreciates the simple things in life and can make anything good out of a bad situation. -Urban Dictionary

Wednesday, May 30, 2012

Cabinet Door DIY Project

What do you do with an old cabinet door that was donated to a thrift store??
Well for 5 BUCKS we will tell ya!


First off, let's explain one of the coolest places in the valley for DIY projects.
Stardust is a non-profit 501(C)3 organization that will take all of your old unwanted building supplies.  Say you are remodeling that master bath?  Stardust will take your old cabinets, faucets, shower doors and light fixtures (and you can write it off).  More information about them can be found at www.stardustbuilding.org
They have two locations here in the valley and addresses can be found by going to the website.
We discovered them back in 2008 when our own kitchen remodels had us wanting to dress up existing cabinetry.  Plus by utilizing Stardust, materials are diverted from local landfills and recycled to folks like us who are always looking for value.  The proceeds from these stores fund community service programs including Angels On Call and Computers for Kids.  


Employee Brian at the Mesa location was a huge help in locating matching doors for our project, so we just had to include him!  Tell him the "blogger girls" said hello!

So, now onto the project!  We have many ideas for these doors but for now we will show you the jewelry holder and a serving tray.   Part 2 will be coming with two more uses for the doors.


Above you can see the Handy Outdoorsman getting to work drilling holes for the tray. 

  Total cost for this tray...5 dollars!  $4 for the door and the pair of handles were $1.

Next up is this jewelry holder idea which has been making its way around the Pinterest scene.  We made a few of these to hang next to each other in our closets.  This one was made for Stacie's 14 year old daughter H, and makes a great addition to some of the black accessories already in her room.
Total cost $5.50
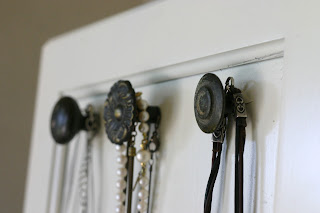
                                     

What Dana really loved about the project were these weathered knobs that were all different and unique.  She has three of these now hanging vertically in her walk-in closet.  It really helped to clear out the jewelry box and save space for smaller items.  Accessorizing is much easier now!

$5.50


this is a beautiful tray but c'mon....89.00 @  Southern Living/Ballard Design
Save the landfill and get creative!

We had so much fun doing this.
Thanks for stopping by the blog today!


Tuesday, May 29, 2012

Reading Glasses...That's it!


So, the Betties are only going to talk about this once...and then we will continue on like we are forever 30.  Turning 40.  What does it mean, how do you celebrate it, how does it make you feel?  Well, in a nutshell the only thing that's bothering us about the day is the short amount of time it took to get here and how fast time is going.  Now, I must add one Betty still has another year and a few months to enjoy her 30's, I don't want to short changer her, but it's still on our brains.  Being 39 is sometimes worse then being 40 because your holding until the ball drops. Well, the ball dropped today for one of the girlfriends and she is happy to report she is alive and well.  No cardiac arrest or arthritis set in over night.  The children were still children and her spouse was still as cute as ever.
Her no gray hair status still remains, but she did cave and buy readers a year ago and can't read restaurant menus in dim lighting.  That's it!  Reading glasses.  So don't fret!

Our top 6 reasons why you need a best friend to help you through this day.

1.  Your husband is completely overwhelmed at the idea of throwing a party for you.  If he isn't than good for him, but you may be enjoying your day eating Pringles from a can and drinking wine from a box because it was on sale. Did I mention he may surprise you with all your favorite people but won't clean the house and you won't have make-up on.  Your girlfriends will not let this happen.  The cute banker did an amazing job at hosting, but let's face it, it's a team effort!

2.  Girlfriends know what you want...they will be an advocate for you on this mile-marker day.

3.  Girlfriends will tell you how cute your outfit is and mention how soft and smooth your skin looks.

4.  Girlfriends will poor the champagne and nudge your husband that it's time for a lovely heart-felt toast.

5.  Girlfriends will be there for the next 40 years.  And something tells me the next 40 will be even more rewarding as we support one another. On the fun side, we will have more time to vacation, dine out (even if we have to eat dinner at 4pm), take up tennis at the club, and play golf together.  On the serious side we will be there for one another.  Enough said.

6.  Girlfriends will be extremely thoughtful, bringing cards and gifts that make you laugh and smile...some may make you cry.  Stacie, you got me on this one!  And the kids love it too!  What a GREAT idea!  And when the container is empty it matches my containers from the pantry makeover;)


Love the thought that went into these personalized notes!


Del Boca Vista Phase 2 may be years away...but we look forward to sharing everything in-between now and then with the dear friends in our lives.  Bottom line, 40 is all hype..."Just keep doing what your doing...because your doing just fine at it!"-J.K.

Proverbs 16:31

New American Standard Bible (NASB)
31 gray head is a crown of glory;
It is found in the way of righteousness.

-BRING IT ON-


Friday, May 25, 2012

Peach Cobbler


Continuing our Peach theme this week...Peach Cobbler A la Mode!

One Betty has deep roots in the great state of Texas and is always trying to make the perfect cobbler...trying to compete with some of the finest in the Lone Star State.

If you have been to Texas ya'll know what she's talkin' about...they do not mess around down there when it comes to BBQ, Cobbler and Sweet Tea.  


When she married the Phoenix native also known as the Cute Banker...he had no idea what cobbler was.  To this day he says, "It looks like a pie that somebody dropped."

Well, she's given up trying to force her love of fruity filled crust down his throat.  He just doesn't get it. 
Instead, she focuses on passing the down-home cooking methods to her 4 boys.  They are growing like weeds, always hungry and would eat a pie that someone dropped.

Thankfully the kids gobble this stuff up leaving this Betty to savor only a bite or two...swimsuit season is here...and cobbler thighs...no thanks.

So here is our version of Texas Peach Cobbler from two Arizona gals:)


1/2 cup crisco
1/2 cup cold butter
2-1/4 cups flour
Cold Water
1-1/4 cups sugar
1 pinch salt
3 Tablespoons flour
2 frozen (16 oz) bags peaches or 4 cups fresh peaches peeled and sliced
1 cup water
1/4 cup butter

Combine crisco and 1/2 cup of cold butter in a bowl with 2-1/4 cups of flour.
Using a pastry cutter work the dough until crumbly and course.
Add about two Tablespoons of cold water or just enough that the dough sticks together.
Once you have a nice round ball, turn it onto a floured surface and roll thin.
(The secret to good pie crust is not overworking the dough and using COLD ingredients)


Cut up remaining 1/4 cup of butter and place in the bottom of a standard 9x13 baking dish.
in a separate bowl combine peaches and water.  Add sugar and 3 T of flour.  Stir to coat peaches.
Transfer Peaches to baking dish and top with rolled out crust.  Sprinkle with a little sugar and bake at 350° for about 50 minutes or until crust is golden.


Serve warm with a scoop of vanilla ice cream.
Enjoy!


“An apple is an excellent thing — until you have tried a peach.”
George du Maurier (1834-1896)


Tuesday, May 22, 2012

Peach Muffins


So this week we are talkin' peaches, as we both have peach trees prime for picking.

These muffins are a great kick start to the morning and a nice treat as the kids celebrate their last week of school!!!  Thank you Lord for summer breaks.


Hang in there...summer break is almost here!


-The Betties


Monday, May 21, 2012

"Movin' to the country...gonna eat me a lot of peaches."


Peach season is upon us here in Arizona.  A little ahead of the curve compared to most states.  Of course if you have a peach tree you know how important it is to get those peaches before the birds do.  So this week it's ALL about baking, canning and freezing peaches.  


Each of us have a peach tree but live in an area where they are bountiful with the heavy irrigation our lots get.  A picture of our neighbor's lot here where the owners have 4 trees.


Our own little tree...it must have 300 peaches on it...which is not a good thing we learned.  Pruning and trimming excess branches will result in fewer peaches but better quality ones. Ours were a bit small this year and branches were too heavy with the load.  Poor little peach tree, the branches were breaking in places.  We are still learning.

Interested in picking your own peaches?  Give Schnepf Farms a try.  I hear the peaches are beautiful this year and bigger than last year.  Pick your own and go early...it's heating up.  


Tune in this week for some yummy peach recipes.  We've got one cooking in the oven right now and it smells delicious!

Also, this one goes out to The Cute Banker...he loves his rock-n-roll.  I guess you could say it's our theme song this week. 


Sunday, May 20, 2012

Total Eclipse of the Heart...

Okay, so it was a beautiful eclipse this evening.  All of the urban acre neighbors were out and about enjoying the scenery.  Pin hole projectors and filters allowed us to see the eclipse perfectly.  Remember that song though...who sings that song???  We were all humming it trying to remember.


Hope you enjoyed it!


Tuesday, May 15, 2012

Frames!


Photographing our kids is one thing we LOVE doing....what to do with all the photographs once they're taken, well we think that's a good problem to have.  Sitting in digital land on the memory card or stored away on CD does nobody any good.  So, once the photos are taken we hop right on it and start planning the purpose for the photographs.  Wall collages, canvases...designing Christmas cards, birthday invitations or perhaps a digital scrapbook or slideshow. We will highlight the photos in some way, you can bet on that!

Well, the time has come to get some more frames up on the wall and we thought we would share a fun DIY project that took just a couple of days and about 80.00 for supplies.   Not bad for 10 frames.

We started out at Michaels with a 25% off coupon for the entire purchase of unfinished frames.  Most frames were only 5 bucks to begin with.  Most of them included the glass and backing too.  After we had the frames picked out we headed over to the stencil aisle and picked up this Martha Stewart stencil pack (which was one of the pricier items ringing in at $17.00...but we have hopes of using it again).


We had interior paint at home and skipped buying paint.  We were even able to use up some of the stain from the outdoor table project.


We picked up a package of wall hangers because some of these unfinished frames didn't have one already attached.  


Once we were home the sanding and painting began! However,  some planning went into how we would arrange the frames, as we wanted each one to be different and unique but compliment the one it bordered.


Next came a trip to Home Depot for the moulding to cut and fit around the frame openings.  Again a variety of moulding that would compliment each other was the goal.  This letter 'K' was on sale for a dollar and we added the paint and stencil pattern to it as well.


Next came the cuts...thank goodness for the men in our lives and their power tools.  


Get crazy with it...have some fun, and obviously any color combination can be used.
Some wood glue is all it took to add the moulding.  Make sure you stain or paint the moulding before attaching it, it will save you some time!


Now off to order the pictures to fill them.


-The Betties


Saturday, May 12, 2012

Happy Mother's Day!

So Mother's Day is here!  As young girls we remember feeling pressure to make our moms feel special.  We worked on Mother's Day school projects and crafts...we honored her with a day off in the kitchen and tried to be on our best behavior.  How could we ever repay our Mothers with one day of kindness?  It seemed like a monumental task!

Flash Forward 20 years.  As first time moms ourselves, with newborn infants to care for,  our husbands had that same pressure building, "I must make her feel special, but how?  I can't nurse the baby, and as hard as I try can't give her the day off...this little one needs her.  Plus I have my own mother that I need to do something special for!"  A bouquet of flowers at the local Safeway and her favorite bottle of perfume.  Time marches on.

Add 5 more years to the picture...now the home is bubbling with 3 or 4 children (depending on which Betty you talk to).  Finally, you give up on the perfect Mother's Day scenario.  What she really wants is a new Kitchen Aid and to be left alone to sleep in...dare you purchase a kitchen appliance for such an occasion?  I mean, this is the stuff people mock and surely she will be disappointed.   You go against better judgment and she is thrilled.  It worked.

Now add an additional 5-10 years with pre-teen children in the home and the fun really begins!!!  The kids can really try and make the day special with a little help from dad still.  Mom, no longer needs to sleep in...her internal clock can't seem to sleep past 7:00 anyway.  She actually can envision (sadly) a day when the kids won't be in the home greeting her with hand made gifts and cards.  The need to get out and have "me" time is still there but is now contrasted with the thought of what little time she has left enjoying all of  her kids at home.  When did this occur?  The moment when you think I cannot keep my eyes open one more minute from sleep deprivation (while nursing your baby) to I have 5 more years and they will be off to college!

Well, this is exactly where these Betties are at in life.  We are relishing in these sweet times when our children aren't as demanding as a newborn, but are unencumbered with life's responsibilities.  Their loyalty is still 100% at home....but not for long.  We know this.  They will move forward, find other interests including careers, love...marriage.  Even becoming mothers and fathers themselves.

Nobody explains this stuff.  Rather you just hear from the stranger in the grocery store, "Enjoy this time, it goes so fast!"   Or the senior citizen at the park, "My children are all grown and have moved away."  One day you snap your fingers and 20 years have just passed you by.  So, what is one to do with these overwhelming yet fleeting moments while raising kids?

Dana has a sign in her kitchen that simply states "Rejoice."  It was purchased near Mother's Day 2007 when she was feeling extremely overwhelmed with 4 children under 5.  In fact that Mother's Day morning they were headed to the hospital to get stitches for one of the twins who had been slashed across the cheek with a wii remote!  She reminded herself of this verse as they packed up to go to the emergency room.  She continued daily to look at the little wooden sign as she washed bottles and prepared meals and tended wounds.


She still has the sign.  She still needs reminding. 
REJOICE this Mother's Day!  You will never again get one like it!  
Happy Mother's Day!
-The Betties


Thursday, May 10, 2012

More outdoor spaces ~ All for Pizza!

We love entertaining friends and who doesn't love a good pizza? Stacie's husband (the handy, outdoorsmen) decided to build an outdoor kitchen, complete with a brick pizza oven. He worked months on ths project and did all the work himself! His hard work paid off and now we enjoy having friends and family over for pizza that everyone seems to love! Here are some pictures of the progress of the building and the end result!


The finished look!


While the handyman is good at building things, he is also good at kneading the dough!
He leaves the rolling to me!

Dough recipe
Bread flour- 1 2/3 cup
Yeast- 1 1/2 tsp.
Sea Salt-3/4 tsp.
Extra Virgin Olive Oil- 1 1/2 Tbl.
Honey- 2 tsp.
Water-3/4 cup

Combine and whisk 1/2 cup of bread flour, yeast, honey, and water: allow to rest for 5 minutes. add olive oil and salt, whisk to incorporate. Begin adding the rest of your bread flour about 1/2 cup at a time, until all flour is added. Turn dough ball out onto a well floured surface and knead dough until it becomes smooth and elastic (8- 10 min.). Cover dough with a towel and allow to rest for 15 minutes. Cut dough balls in half and briefly knead each ball into itself, forming two tight balls. Lightly coat dough with olive oil and allow to rest for one hour, roll it out, and make pizza. They can be placed in plastic bags and stored in refrigerator for up to 2 days; or the freezer up to a month.


As you can see we like lots of toppings and feta cheese is one of our favs!
Enjoy!


Sunday, May 6, 2012

Creating Our Outdoor Spaces Part 1


Summer is almost upon us!!  Which means lots of outdoor fun in the sun.  The last few times we have entertained we have felt short on space for serving food outside.  Of course you can always resort to a folding table with a nice table cloth, but we were looking for something a little more permanent.  We were loving the looks of the outdoor buffets featured in popular catalogs like Pottery Barn and Ballard Design.  But we were not keen on the prices!

Pottery Barn

This is a piece of furniture that will sit outdoors under the patio but during certain times of the day will get some sun.  Drinks will be spilled and chips and dips will be dropped on it. Also, let's not spend a thousand dollars on something that will be laden with dust in no time with our famous haboobs rolling in during monsoon season.

So, the girls started searching for a solution that met their budgets and came up with this piece from Ikea. Great news...two hundred bucks! This table has the length they were looking for (over 70 inches) combined with a nice height.  The shelving offered two racks for storing plates and serving dishes.  Plus this table has 3 good sized drawers that they can keep outdoor placemats, tablecloths, grilling supplies and napkins in.  Don't forget the wine opener!


It required some staining to get the outdoor effect they were going for, which took up a day so that it could dry. Also, the time it took to actually put the table together was about three hours.  All in all it was worth it, and finding the accessories at Home Goods and Kirkland was the fun part.


Dana may add wheels and a towel rack like the one from Pottery Barn, but for now...this one is doing it's job!  Can't wait for the memorial day BBQ to see how it functions.

Have a Great Day!
-The Betties